There’s nothing quite like the aroma of fresh, homemade sourdough bread filling your kitchen. This traditional sourdough recipe is my go-to for creating the perfect loaf with a crisp crust and a chewy, flavorful crumb. Whether you're new to sourdough baking or a seasoned pro, this step-by-step guide will walk you through everything you need to know, from mixing the dough to achieving that perfect rise and bake. Made with simple ingredients and plenty of patience, this bread delivers on flavor and texture every time. Plus, it’s incredibly versatile—whether you enjoy it fresh with butter, use it for sandwiches, or save it for toast, you’ll find this sourdough to be a staple in your kitchen.
In this post, I’ll share some of my best tips and techniques for creating consistently great sourdough bread, as well as common adjustments for different textures and tastes. If you're ready to bake, let's dive into the process and start crafting your perfect loaf!


What is Sourdough Bread?
Proofing Containers: What to Use for Your Sourdough
When it comes to proofing your dough, you don’t always need to use a banneton basket. There are plenty of other options that work just as well, especially if you’re just starting out. Here are a few alternatives:
1. Bowl Lined with a Tea Towel or Flour Sack Towel
A simple bowl lined with a clean tea towel or flour sack towel is a great alternative to a banneton. Lightly dust the towel with flour (rice flour works best) to prevent sticking. This is a perfect beginner-friendly method that you likely already have in your kitchen.
2. Banneton Basket
A banneton basket is the traditional choice for proofing sourdough. Its shape and material help create beautiful spiral patterns on the dough while allowing for proper airflow, which aids in developing a nice crust. If you have one, great! If not, no worries—there are plenty of alternatives.
3. Loaf Pan
You can also proof your dough directly in a loaf pan, especially if you prefer a sandwich loaf shape. This method is convenient for those who want a simple, structured shape without needing to transfer the dough after proofing. It’s an easy, practical option for beginners.
4. Colander
A colander lined with a towel can also work well for proofing. The colander’s structure supports the dough, and the towel helps keep the dough from sticking. It’s a simple solution if you don’t have a banneton basket.
5. Tupperware or Plastic Container
For cold proofing, a Tupperware or plastic container with a lid can be a great option. It’s airtight, which helps prevent the dough from drying out during an extended proof in the fridge.
Choosing the Right Pan for Sourdough Baking
Selecting the right pan is crucial for achieving the best results with your sourdough bread. Different baking methods can affect your bread's rise, crust, and overall texture. Here’s a breakdown of the most common methods, along with their benefits:
1. Loaf Pan (Recommended for Beginners)
As a beginner, I recommend starting with a loaf pan. This method is simple, accessible, and doesn’t require special equipment. A loaf pan helps support the dough as it rises, ensuring a more controlled shape, which is especially helpful for those just starting out.
To create steam (which is essential for a good oven spring and crust), you can place another loaf pan upside down on top during baking. This traps steam and simulates the environment of a Dutch oven, giving you a crisp crust without needing extra gear. It’s an affordable and effective way to bake beautiful sourdough loaves!
2. Roasting Pan
If you’re looking for another inexpensive option, a roasting pan works wonderfully for sourdough baking. Like a Dutch oven, a roasting pan traps steam inside, allowing your bread to rise fully and develop a crispy, golden crust. The key benefit of a roasting pan is its ability to hold larger loaves and provide excellent steam retention without the heaviness or cost of a Dutch oven.
This is a great middle-ground method, giving you a more professional result while keeping things easy and budget-friendly.
3. Dutch Oven/Bread Oven
For bakers who are ready to level up, the Dutch oven or bread oven method is the gold standard for artisan-style sourdough loaves. A preheated Dutch oven traps steam and maintains an even temperature, helping you achieve maximum oven spring, an open crumb, and a thick, crunchy crust.
While Dutch ovens and bread ovens can be heavier and more expensive, they deliver professional-quality results, making them perfect for experienced bakers or those looking to take their sourdough to the next level. For those interested, I have some highly recommended options in my Amazon storefront.
4. Open Bake Method
For the open bake method, you bake the bread directly on a baking stone or sheet without any cover. This method produces a more rustic loaf with a harder, crunchier crust since there is no steam trap to soften it.
The open bake method allows the bread to develop a deep golden color and robust texture, but it requires more care to ensure even browning and to avoid drying out the loaf. It’s perfect for those who love a crisp, rustic crust and have experience managing hydration levels and baking times.
Traditional Sourdough Bread: Ingredients & Equipment You Will Need
The Importance of Temping Your Dough
One of the key elements of successful sourdough bread baking is controlling the dough temperature. Temping your dough helps regulate the bulk fermentation process, especially in cooler environments where dough may rise slower.
To maintain a consistent temperature, aim for a dough temp of 78°F (26°C). This can be achieved by using 78°F (26°C) water when mixing the dough. If your dough temperature is too low after mixing, you can use the reserved water to adjust the temperature. Temping your dough ensures proper fermentation, helps guide your rise times, and makes your baking process more predictable.
Bulk Fermentation: Signs Your Dough is Ready
Bulk fermentation is one of the most crucial stages in sourdough baking, and knowing when it’s complete is key to getting the perfect rise. The goal is for the dough to increase by about 30% in volume during this time.
Here are the signs that bulk fermentation is complete:
- Domed edges: The dough will look smooth and slightly domed around the edge of the bowl, indicating it has expanded properly.
- Bubbles: The surface of the dough should have visible bubbles, showing that fermentation is active.
- Jiggly dough: When you gently jostle the bowl, the dough should jiggle like jelly.
- Dough pulling away from the sides: The dough should start pulling away from the sides of the bowl as it expands and strengthens.
- Windowpane test: If you take a small piece of dough and stretch it gently, it should form a thin, translucent "window" without tearing. This indicates that the gluten is well-developed.
The timeline for bulk fermentation can vary depending on your environment. Warmer kitchens may take 3-4 hours, while cooler kitchens might take longer. Keep an eye on the dough rather than the clock to ensure it’s perfectly fermented before moving on to shaping.
Bulk Fermentation Chart
Use this chart to guide you through the bulk fermentation process based on the temperature of your dough. Adjust timing according to your dough’s temperature and target rise.
| Dough Temp | Target Rise | Approx. Timing |
|---|---|---|
| 80°F / 27°C | 30% | 3.5-5.5 hours |
| 75°F / 24°C | 50% | 5-7 hours |
| 70°F / 21°C | 75% | 8-12 hours |
| 65°F / 18°C | 100% | 12-16 hours |
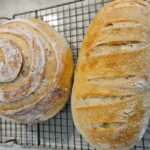
Jake’s Go-To Traditional Sourdough Bread
- Total Time: 20 hours 10 minutes
- Yield: 2 loaves 1x
Description
This Traditional Sourdough Bread is a beautifully handcrafted loaf with a crisp, golden crust and a soft, chewy interior. Made with just three simple ingredients—flour, water, and salt—this sourdough delivers a subtle tang, complex flavor, and perfect texture that only slow fermentation can achieve. Whether you’re serving it alongside meals, using it for sandwiches, or simply enjoying it with butter, this versatile bread is a delicious staple in any kitchen. This is an ideal choice for both beginners and experienced bakers looking for a classic, wholesome sourdough loaf.
Ingredients
Ingredients:
- 1000 grams white flour (11.5% protein)
- 650 grams spring water (room temperature or adjusted for dough temp)
- 20 grams salt
- 150 grams ripe sourdough starter
Instructions
- Mix the Dough: Add 600 grams of water (aim for 78°F/26°C) to the starter and mix in a large bowl using a dough whisk. Next, add the salt and gradually add the flour in 3 parts, mixing well between each addition to remove lumps. Add the reserved 50 grams of water (adjusted in temperature) to bring the dough to your desired temperature. If the dough feels too soupy, you can gradually add more flour. Aim for a moist, shaggy dough, with most of the lumps gone. Once the dough becomes tough to mix, use wet hands and a plastic scraper to finish mixing. Finally, scrape down the sides to clean the bowl and let the dough rest for 1 hour. After mixing, temp the dough to ensure it’s around 78°F/26°C, which will guide the bulk fermentation process.
- Stretch and Fold (or Coil Folds): After the dough rests, perform a set of stretch and folds: With wet hands, gently lift one side of the dough and fold it over itself. Rotate the bowl 90 degrees and repeat the process 4 times. Alternatively, you can use coil folds by lifting and tucking the dough underneath itself. Cover the dough and let it rest for 30 minutes.
- Repeat the Stretch and Folds: Perform two more sets of stretch and folds every 30 minutes for a total of 3 sets. Once the folds are complete, allow the dough to rest and begin bulk fermentation. The bulk fermentation time will depend on your dough temperature, with 78°F/26°C being an ideal temperature for a timely rise. The goal is for the dough to increase in volume by about 30%.
- Divide and Preshape: Once the dough has risen by 30% and the bulk fermentation is complete, lightly flour your surface and divide the dough into two equal pieces, approximately 960 grams each. Lightly shape each piece into a round by pulling the sides inward to create tension. Let the dough rest for 15-20 minutes to allow the gluten to relax.
- Shape the Dough: After the dough has rested, shape it into its final form. For a round loaf, fold the dough’s sides toward the center and roll it into a ball, creating surface tension. For a loaf shape, flatten the dough into a rectangle, fold the edges in, and roll it into a tight log. Place the dough into your proofing container—if using a banneton basket, place it seam side up; if using a loaf pan, place it seam side down.
- Final Proof: Cover the dough and let it proof in the refrigerator for 12-18 hours (cold proof). During this time, the dough will continue to rise and develop a deeper flavor.
- Preheat the Oven: Preheat your oven to 450°F (232°C). If you’re using a Dutch oven or bread oven, allow it to preheat for at least 30 minutes. If you’re using a loaf pan or roasting pan, preheating the pan is not necessary.
- Bake the Bread: Once the dough is fully proofed, carefully turn it out onto parchment paper or a sling. Dust the top with rice flour or white flour and score the dough to allow it to expand during baking. Place the dough into your preheated Dutch oven (or cover the loaf pan with another loaf pan) and bake for 20 minutes covered. After 20 minutes, remove the cover and bake for another 20 minutes or until the internal temperature reaches at least 200°F (93°C). For a darker crust, bake until the internal temperature reaches 204-206°F (96-97°C).
- Cool the Bread: Once baked, remove the bread from the oven and let it cool on a wire rack for at least 1 hour before slicing. This allows the crumb to set properly.
Notes
- If the dough seems too soupy during mixing, add additional flour gradually. Start with 600 grams of flour and reserve the remaining 50 grams, adjusting as needed for a moist but manageable dough.
- Cold proofing the dough in the fridge for 12-18 hours develops deeper flavors and enhances texture. Allow the dough to return to room temperature before baking if preferred.
- For a more controlled dough temperature, adjust the temperature of the reserved water as you mix.
- Prep Time: 19 hours 30 minutes
- Cook Time: 40 minutes
- Category: Sourdough Bread
- Method: Oven-Baked
- Cuisine: American