Description
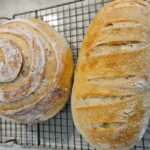
This Traditional Sourdough Bread is a beautifully handcrafted loaf with a crisp, golden crust and a soft, chewy interior. Made with just three simple ingredients—flour, water, and salt—this sourdough delivers a subtle tang, complex flavor, and perfect texture that only slow fermentation can achieve. Whether you’re serving it alongside meals, using it for sandwiches, or simply enjoying it with butter, this versatile bread is a delicious staple in any kitchen. This is an ideal choice for both beginners and experienced bakers looking for a classic, wholesome sourdough loaf.
Ingredients
Scale
Ingredients:
- 1000 grams white flour (11.5% protein)
- 650 grams spring water (room temperature or adjusted for dough temp)
- 20 grams salt
- 150 grams ripe sourdough starter
Instructions
- Mix the Dough: Add 600 grams of water (aim for 78°F/26°C) to the starter and mix in a large bowl using a dough whisk. Next, add the salt and gradually add the flour in 3 parts, mixing well between each addition to remove lumps. Add the reserved 50 grams of water (adjusted in temperature) to bring the dough to your desired temperature. If the dough feels too soupy, you can gradually add more flour. Aim for a moist, shaggy dough, with most of the lumps gone. Once the dough becomes tough to mix, use wet hands and a plastic scraper to finish mixing. Finally, scrape down the sides to clean the bowl and let the dough rest for 1 hour. After mixing, temp the dough to ensure it’s around 78°F/26°C, which will guide the bulk fermentation process.
- Stretch and Fold (or Coil Folds): After the dough rests, perform a set of stretch and folds: With wet hands, gently lift one side of the dough and fold it over itself. Rotate the bowl 90 degrees and repeat the process 4 times. Alternatively, you can use coil folds by lifting and tucking the dough underneath itself. Cover the dough and let it rest for 30 minutes.
- Repeat the Stretch and Folds: Perform two more sets of stretch and folds every 30 minutes for a total of 3 sets. Once the folds are complete, allow the dough to rest and begin bulk fermentation. The bulk fermentation time will depend on your dough temperature, with 78°F/26°C being an ideal temperature for a timely rise. The goal is for the dough to increase in volume by about 30%.
- Divide and Preshape: Once the dough has risen by 30% and the bulk fermentation is complete, lightly flour your surface and divide the dough into two equal pieces, approximately 960 grams each. Lightly shape each piece into a round by pulling the sides inward to create tension. Let the dough rest for 15-20 minutes to allow the gluten to relax.
- Shape the Dough: After the dough has rested, shape it into its final form. For a round loaf, fold the dough’s sides toward the center and roll it into a ball, creating surface tension. For a loaf shape, flatten the dough into a rectangle, fold the edges in, and roll it into a tight log. Place the dough into your proofing container—if using a banneton basket, place it seam side up; if using a loaf pan, place it seam side down.
- Final Proof: Cover the dough and let it proof in the refrigerator for 12-18 hours (cold proof). During this time, the dough will continue to rise and develop a deeper flavor.
- Preheat the Oven: Preheat your oven to 450°F (232°C). If you’re using a Dutch oven or bread oven, allow it to preheat for at least 30 minutes. If you’re using a loaf pan or roasting pan, preheating the pan is not necessary.
- Bake the Bread: Once the dough is fully proofed, carefully turn it out onto parchment paper or a sling. Dust the top with rice flour or white flour and score the dough to allow it to expand during baking. Place the dough into your preheated Dutch oven (or cover the loaf pan with another loaf pan) and bake for 20 minutes covered. After 20 minutes, remove the cover and bake for another 20 minutes or until the internal temperature reaches at least 200°F (93°C). For a darker crust, bake until the internal temperature reaches 204-206°F (96-97°C).
- Cool the Bread: Once baked, remove the bread from the oven and let it cool on a wire rack for at least 1 hour before slicing. This allows the crumb to set properly.
Notes
- If the dough seems too soupy during mixing, add additional flour gradually. Start with 600 grams of flour and reserve the remaining 50 grams, adjusting as needed for a moist but manageable dough.
- Cold proofing the dough in the fridge for 12-18 hours develops deeper flavors and enhances texture. Allow the dough to return to room temperature before baking if preferred.
- For a more controlled dough temperature, adjust the temperature of the reserved water as you mix.
- Prep Time: 19 hours 30 minutes
- Cook Time: 40 minutes
- Category: Sourdough Bread
- Method: Oven-Baked
- Cuisine: American